Marko is a JavaScript based reactive, UI-component library from eBay. It allows you to create modern web-applications in a declarative way. Launched in 2017, Marko is currently on version 5. At the time of this writing, it has 10.2K stars on GitHub.
Marko allows you to create components in a single file, as well as you can choose to split the components in multiples files out-of-the-box. You can also define your components in a Jade-like concise syntax.
Quickstart
The quickest way to create a Marko application is to open Terminal (or CMD) and use npx.
|
|
where my-app is the name of the application in this example.
You will be asked to choose a template to start with. Select Default starter app and hit enter. Your first Marko application is setup. To run the application in development mode, do the following.
|
|
You should have your first application running on http://localhost:3000 looking like the following in the browser.

Coding exercise
We will get our hands dirty with a small Hello world! example in a single-file component. We will make changes to the auto-generated src/pages/index/index.marko file. This file is actually a component but the Default starter app created it as a high-level page.
Initial HTML code
We will replace the all the existing code in the file with the following.
|
|
Adding some styling
Adding style to the component is as simple as declaring a style code-block and defining CSS rules.
|
|
We have created two CSS classes, grey-head and body-text and applied each of these to our h1 and p tags.
Adding JavaScript to the code
We can define our JavaScript logic in a class code-block.
|
|
We have defined onCreate method which is a life-cycle method called when the component is mounted. Inside this function, we have defined the initial state of the application. We can refer to this state variable in HTML using interpolation like ${state.author}. Interpolation can be any valid JavaScript statement like ${state.author || 'me'}
|
|
We have changed our HTML to refer to the state.author variable and fallback to 'me' if state.author resolves to undefined.
Binding the text field to a method
We will next define a method called changeAuthor, add a text field to the UI, and bind these such that whenever the user types something text field, author name changes on our page. The text field will itself be controlled with state.author variable.
|
|
We have defined a new method changeAuthor (line 10 above) which read the value from the event’s target and updates the state of the component.
|
|
On line 6, we have accomplished the following two things.
- We are telling application to call
changeAuthormethod whenever the text field changes its text. The syntax ison-<event>("<methodName>"). Please note that if we chooseon-changeinstead ofon-input, the method will only trigger when the user types something and clicks out of the text field. - We are attaching the
state.authorvariable to our text field to establish two-way binding. To do so, we writevalue=state.variable.
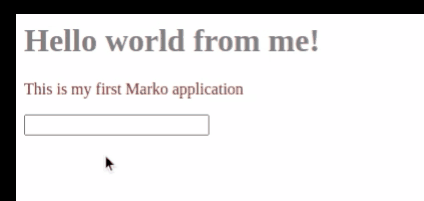
You should be able to see the following output in your application.
Final code
The final code in src/pages/index/index.marko looks like:
style {
    .grey-head {
        color: grey;
    }

    .body-text {
        color: brown;
    }
}

class {
  onCreate() {
    this.state = {
      author: ''
    }
  }
  changeAuthor(e) {
      this.state.author = e.target.value
  }
}

<div>
    <h1 class="grey-head">Hello world from ${state.author || 'me'}!</h1>
    <p class="body-text">This is my first Marko application</p>
    <input type="text" on-input("changeAuthor") value=state.author/>
</div>
You can also download it from https://github.com/kashifnazar/marko-getting-started.